Showing posts with label DIY. Show all posts

Monday, 26 November 2018

CHRISTMAS CRAFT CLASS

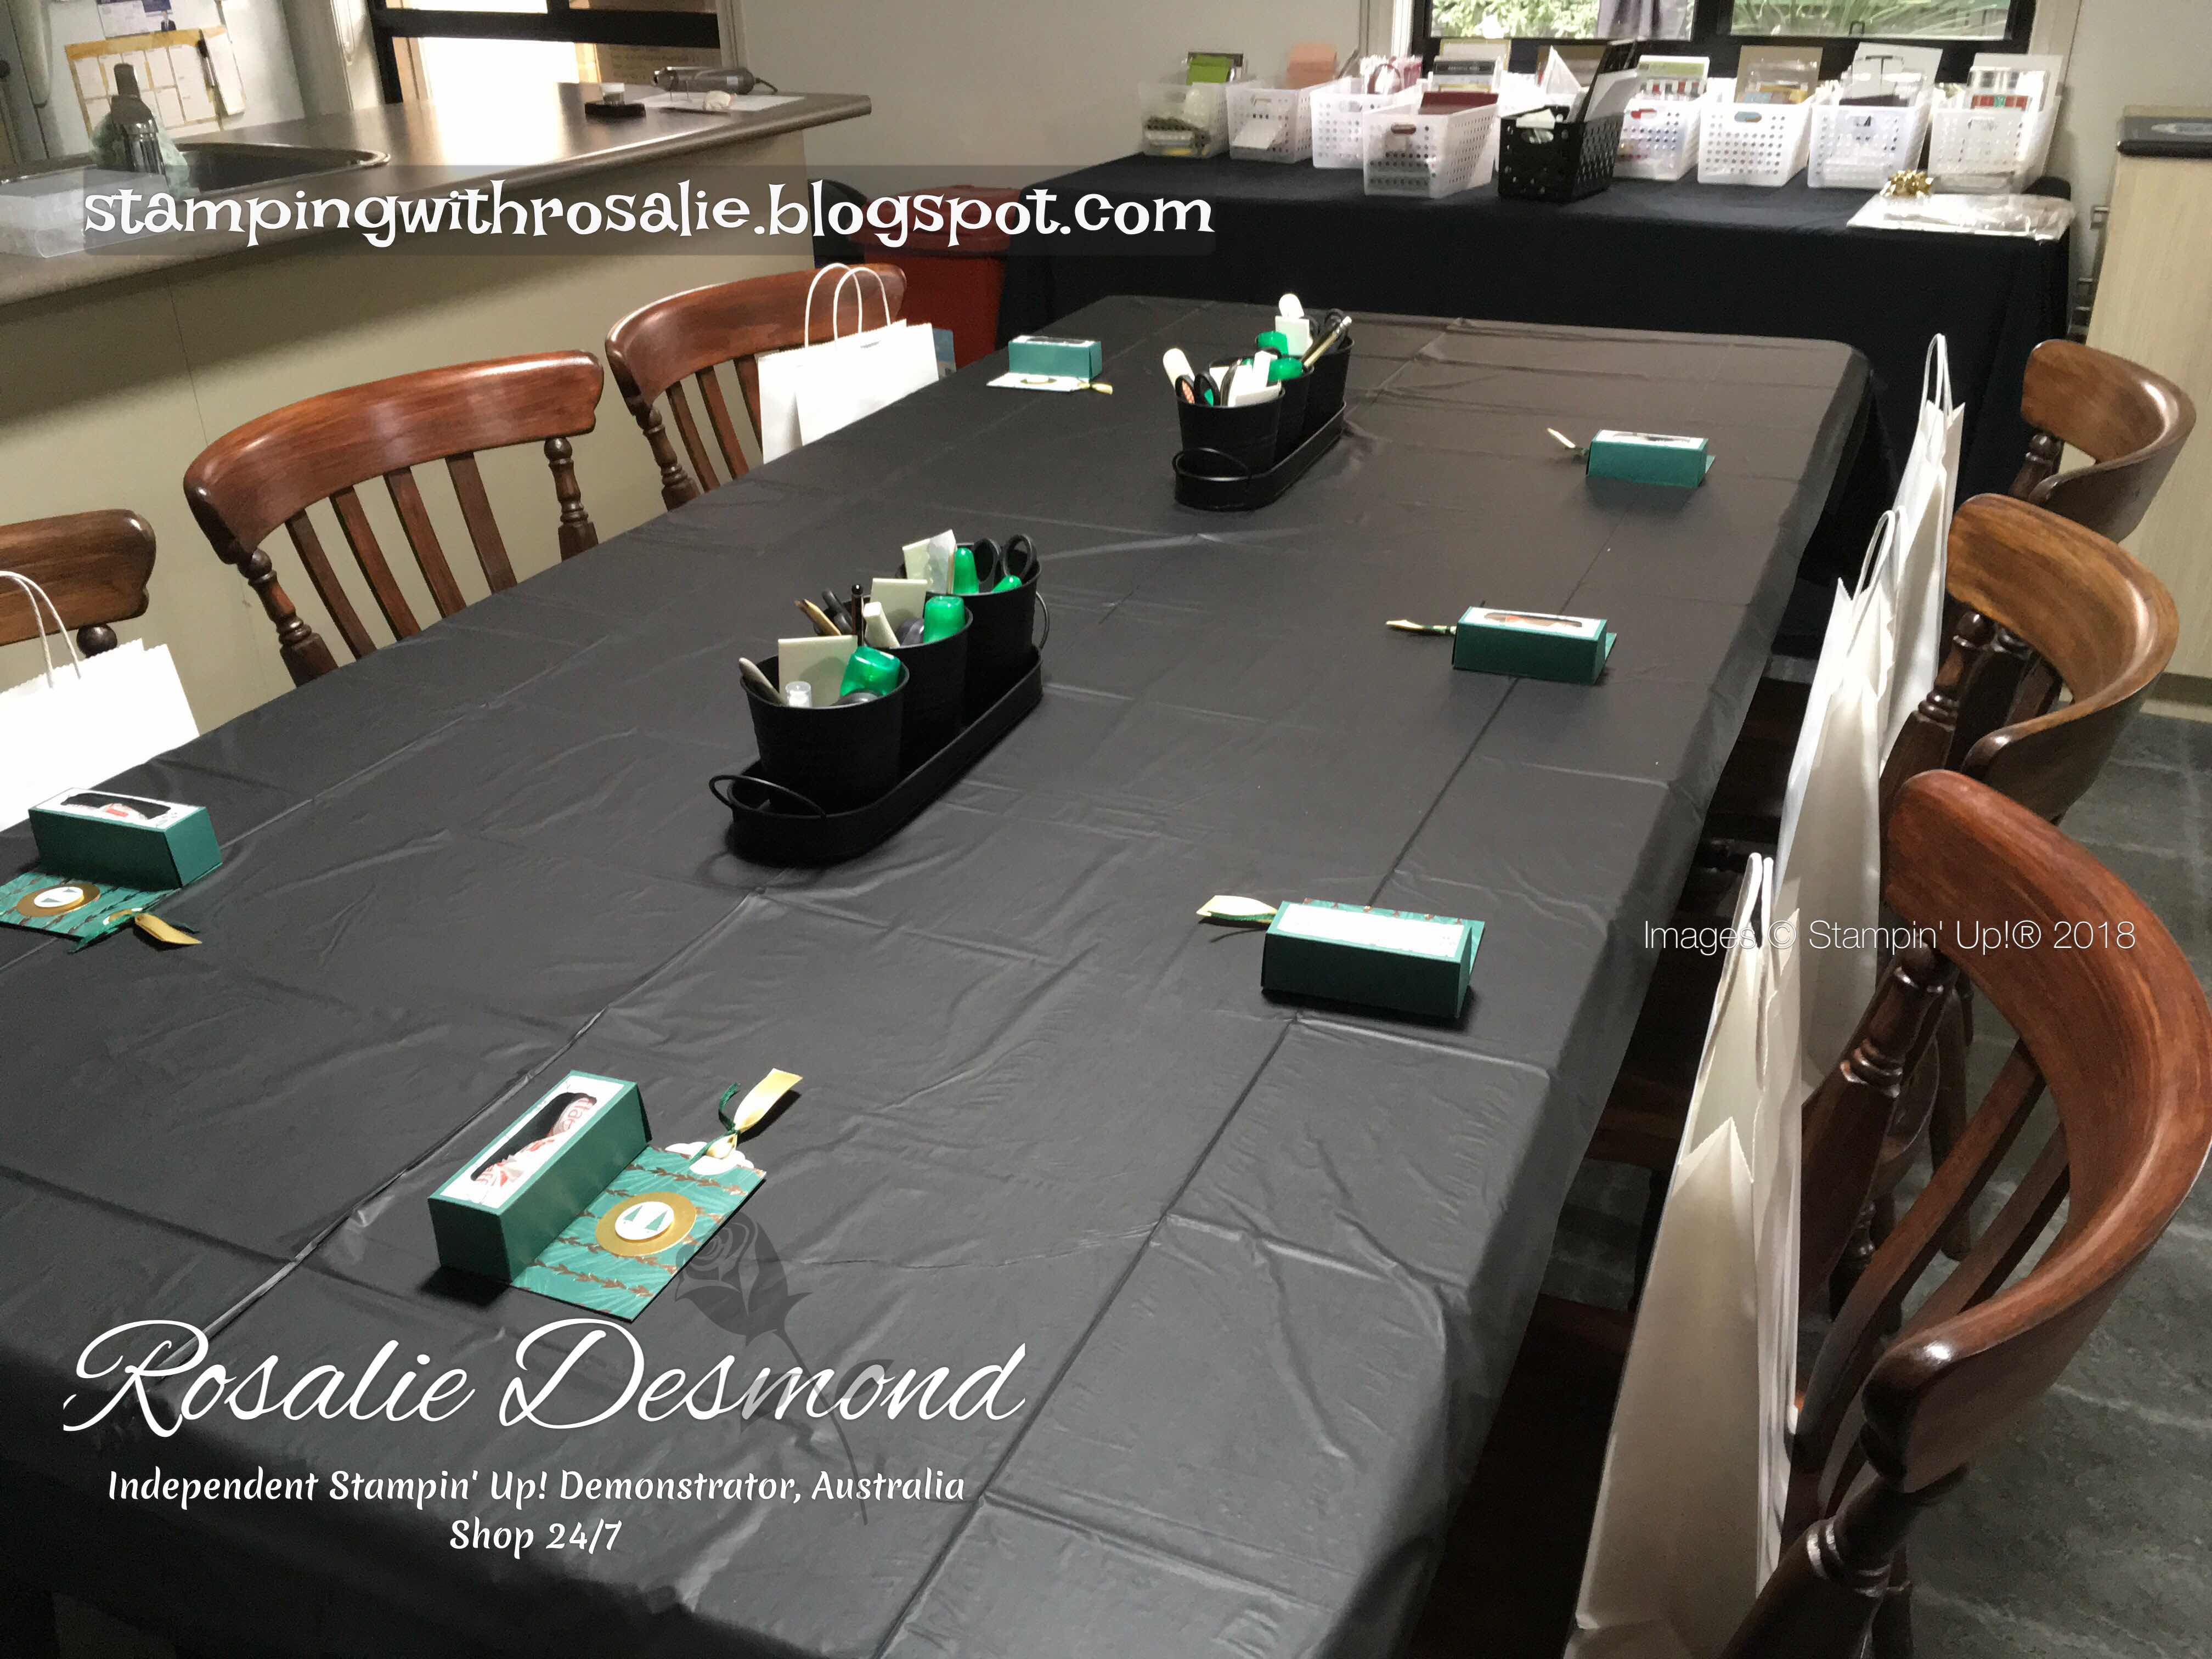
Thought I would share some pictures from the Christmas crafting day I had on the weekend. Someone did forget to take pictures throughout the day, so I just have the before pictures to share with you. Over the next couple of weeks I will share some of the projects in more detail with you.

When I run a full day class I like to have all the items needed and the sample project in the one basket, so an attendee can just grab the basket. sit at their seat and where possible not have to hunt for the correct colour ink or stamp set. Sometimes there is a little cross over, where two projects use the same punch or set but I do try to keep this to a minimum.


I like to provide my participants with a bag which includes a little surprise inside (this time is was some 6"x6" samples of DSP) and a small table gift. The bag comes in handy later to store all of their projects, making it easy to take home.


At my day long events, I also have a door prize. The name of all people in attendance are placed into a bowl and a winner is chosen at random. This was the prize for this event.


Until next time, happy crafting!

Wednesday, 10 October 2018

MINI GABLE BOX


Today I am joining in an International Demonstrator Blog Hop. I hope that you find inspiration from all around the world. You are currently visiting Rosalie Desmond from Australia. .

Papercraft isn't just about card making. It is also about boxes, bags, tags, home décor and the like.

Today I would like to share with you this cute little gift box. By simply dressing up a Silver Mini Gable Box I have a box ready to go for gift giving.


I used a 1.5cm strip of Gorgeous Grape card stock and wrapped it around the box, stuck a Pineapple Punch circle, added a Pearlized Doily and fussy cut out a flower image from Love What You Do stamp set which was coloured using Gorgeous Grape ink and blender pen. 


These make great little presents or even a table favour.


I hope you have enjoyed my project and don't forget tp check out all the other blogs. You just never know what you might find.

Happy crafting,
Rosalie


Products Used:


Silver Mini Gable Boxes 145568

Love What You Do 148042

Pearlized Doilies 146936


Thursday, 6 September 2018

Polished Stone Technique

Every now and then I like to have a play with a new technique. There is actually nothing new about the technique I have used today but it is a first for me.

The polished stone technique uses rubbing alcohol and reinkers on glossy paper to make fun and interesting backgrounds. One of the things I love about this technique is that each time you do it, it works out a little differently.


This card uses Lemon Lime Twist and Berry Burst reinker to create the background and the Beautiful Day Stamp set for the images and sentiment.


Happy crafting,
Rosalie

Products Used: 


Beautiful Day 145915

A4 Glossy White Cardstock 144241

Saturday, 25 August 2018

CHRISTMAS CHALLENGE STAMP-A-THON - ONE SHEET WONDER

Welcome to the latest Christmas Challenge Stamp-a-thon.  This is a collaboration between four Stampin' Up! Demonstrators friends. Ruth Trice 'Artful Stampin' from the UK, Denise Garrison 'Lady Bug Stampin' from USA, Ellen Woodbridge from Australia and myself. . The Challenge is set on the 25th of the month, each month has a different theme. The challenge this month is to use a one sheet wonder.

One sheet wonders are fast and easy ways to create a number of cards or projects using the one sheet of card stock or DSP. Particularly at Christmas, when we often have little time and have a large number of projects to complete, a one sheet wonder is perfect.

For this challenge I have chosen to use one piece of Under The Mistletoe Designer Series Paper to create my projects. Out of one sheet I made 7 cards.


The card bases are created from half A4 sheers of Real Red, Early Expresso, Old Olive and Shaded Spruce card stock.


The sentiments and decorations come from the Peaceful Noel Stamp Set (which is a sneak peek from the upcoming 2018 Holiday catalogue which is available to customers from the 5th September).


A little ribbon and some bling, and you are done. 


For further details on this project, please see the video attached.


One sheet wonder templates are readily available, so you should be able to locate one to suit your needs, or you can make your own as I did.


If you would like to join us in the challenge or would like some inspiration from other people's entries, you will find the Christmas Challenge Stampaton 2018 on facebook.


Happy crafting,

Rosalie


Friday, 24 August 2018

PUZZLE GIFT WITH STORAGE BOX

The moment I saw the puzzle die in the 2018-2019 Annual Catalogue I knew that I had to make this project. I've had this one done for awhile but as life is crazy, it has taken me awhile to actually share it with you.


The puzzle itself takes mere moments to create as the thinlit does all the work for us. The storage box takes a little longer, but not by much.


These puzzle sets would make wonderful gifts to add to a loot bag after a child's birthday party or a super cute table enhancement at the Christmas table. By simply changing the Designer Series Paper you use, you can instantly change the theme.


To see just how quick and easy these are to make, take a look at my YouTube. If you like my videos, don't forget to subscribe to stay up to date on all my latest creations.


Until next time. Happy crafting,
Rosalie

Sunday, 12 August 2018

CRAZY CRAFTERS BLOG HOP WITH ALISON SOLVEN


Welcome once again to a Crazy Crafters Blog Hop. This time we are CASEing (Copy And Selectively Edit) any project that has been created by Alison Solven. Thank you so much Alison for joining us today, her work is amazing. Make sure you take some time later to check out her blog. We hope you find great inspiration from todays projects.

You may just be starting the blog hop here at my blog - Rosalie Desmond or may have come from the person previous to me. Be sure to click on the person listed under me further down the page to continue your journey on this blog hop.

Alison inspired me to use some of the Delightfully Detailed Laser-cut Specialty Paper and create this card.


 Here is Alison's project that I CASEd (Copy And Selectively Edit).


I teamed the Delightfully Detailed Laser-cut Specialty Paper with the Very Vintage stamp set and the Petal Pink ribbon from the Metallic Ribbon Combo to create my card. I used sponge daubers to add colour to the Specialty Paper using Lemon Lime Twist, Berry Burst and Powder Pink.


PRODUCTS USED:


Very Vintage (HOST SET) 146801


Delightfully Detailed Laser-cut Specialty Paper 146907
Metallic Ribbon Combo 146329


I hope you enjoy the remainder of the hop. 

Happy crafting,

Rosalie


Monday, 29 May 2017

CRAZY CRAFTERS BLOG HOP -- ANNUAL CATALOGUE SNEAK PEEK


Welcome once again to a Crazy Crafters Blog Hop. This time we are giving you a little Sneak Peek from the 2017-2018 Annual Catalogue. We hope you find great inspiration from todays projects.

You may just be starting the blog hop here at my blog - Rosalie Desmond or may have come from the person previous to me. Be sure to click on the person listed under me further down the page to continue your journey on this blog hop.

Today I am sharing a creation that I made for my daughter using the new stamp set - Daisy Delight and the matching Daisy Punch.


It is a very simple but yet affective project. I stamped out the flower images from Daisy Delight in Daffodil Delight and Crushed Curry. For each flower I used three images and layered them up to create a 3D flower.

Once I made enough flowers, I then added them to a headband using hot glue. Then...TA DA! done.


I hope you like my idea of using these products to make a little something special. Thank you for joining me today. I hope you enjoy the remainder of the blog hop,

Rosalie


Saturday, 15 April 2017

BLOOMIN' LOVE

I hope everyone is having a great weekend. Today I have a lovely hello card to share with you. We love our friends and we love our family, so why not give them a nice "Hello" every once and awhile. I had a bit of a play with my neglected Bloomin' Heart Thinlits and the matching Bloomin' Love stamp set.


I cut out a heart in Emerald Envy and another in Dapper Denim and layered them to create a shadow effect. The edges are stamped with a small flower stamp from the Bloomin' Love set in Emerald Envy.

Thank you for joining me today,
Rosalie

Wednesday, 8 February 2017

Washi Wednesday #1

Happy Wednesday!


I have had a lot of people asking me "how do I use Washi tape?", so over the next few weeks I will do some Washi Wednesday blog posts to give you some ideas to get you started.

Now I must admit I rarely think of using washi. With so many fun products to choose from, it doesn't surprise me that something is forgotten. Washi is a low tack tape and it is so easy to use. It is a quick and simple way to add that little something to any project or home décor.

Today I am going to use Moroccan Designer Washi Tape.

Moroccan Designer Washi Tape  (141647)
                                               
I have decided for the first project in my series on using washi tape I would make a card. I chose to use the washi as a way to decorate one of the elements.


Firstly I started by putting some washi on some whisper white cardstock.


Then I cut out my image. In this case it was the wreath from the Wonderful Wreath Framelits.


I then used this element on my card by popping it, using dimensionals and adding a sentiment.


Nice, quick and simple.


I love the way this card turned out. It was so quick and easy to put together. You can use the same simple technique and cut out whatever shape that suits your needs. Always remember that framelits are just shapes. This set was designed to be used for Christmas, but there is nothing to say that you can't find other uses for them, like I have here. In a very similar way, the stamp set I choose to use is aimed for "birthdays" but I have used it to make a card that can be used to celebrate any occasion.


BIRTHDAY BRIGHT STAMP SET (142835)


Wonderful Wreath Framelits Dies (135851)

Thank you for stopping by. Looking forward to next Wednesday to see what other uses we can find for our Washi.

Rosalie


SALE-A-BRATION
FREE products!!!

For very $90 you spend you receive a FREE item from the exclusive Sale-a-Bration catalogue. These products can not be purchased, but must be earned during the Sale-a-Bration period. You earn one item for every $90 you spend. So if you spend $90 - you can choose 1 FREE item, if you spend $180 - you choose 2 FREE items. I think you get the idea. The more you spend, the more FREE items you receive.

Sunday, 22 January 2017

Crazy Crafters Blog Hop with Valerie Moody


Welcome once again to a Crazy Crafters Blog Hop. This time we are CASEing (Copy And Selectively Edit) any project that has been created by Valerie Moody. Now what can I say but "WOW!", it was hard to choose just one to CASE. Her blog is full of amazing projects. We hope you find great inspiration from todays projects.
 
You may just be starting the blog hop here at my blog - Rosalie Desmond or may have come from the person previous to me.  Be sure to click on the person listed under me further down the page to continue your journey on this blog hop.


When I came across this card I loved it at first sight and kept going back to it, so this is where my inspiration came from.


This technique is heaps of fun. It is very quick to come up with an unique background. I used a clear block and placed it into an ink pad and then put the wet block on the card. With this technique, each card looks different.


I used the Stampin' Up! notecards to make a couple of quick cards. This first one uses Peek-a-boo Peach ink.


This second card uses Mint Macaroon. I just love the bubbly background on this card.


Dragonfly Dreams was used for both the sentiments and the dragonfly image.


I hope you enjoy the rest of the blog hop.


Thanks for stopping by,
Rosalie