Showing posts with label Card Making Australia. Show all posts

Monday, 26 November 2018

CHRISTMAS CRAFT CLASS

Thought I would share some pictures from the Christmas crafting day I had on the weekend. Someone did forget to take pictures throughout the day, so I just have the before pictures to share with you. Over the next couple of weeks I will share some of the projects in more detail with you.

When I run a full day class I like to have all the items needed and the sample project in the one basket, so an attendee can just grab the basket. sit at their seat and where possible not have to hunt for the correct colour ink or stamp set. Sometimes there is a little cross over, where two projects use the same punch or set but I do try to keep this to a minimum.


I like to provide my participants with a bag which includes a little surprise inside (this time is was some 6"x6" samples of DSP) and a small table gift. The bag comes in handy later to store all of their projects, making it easy to take home.


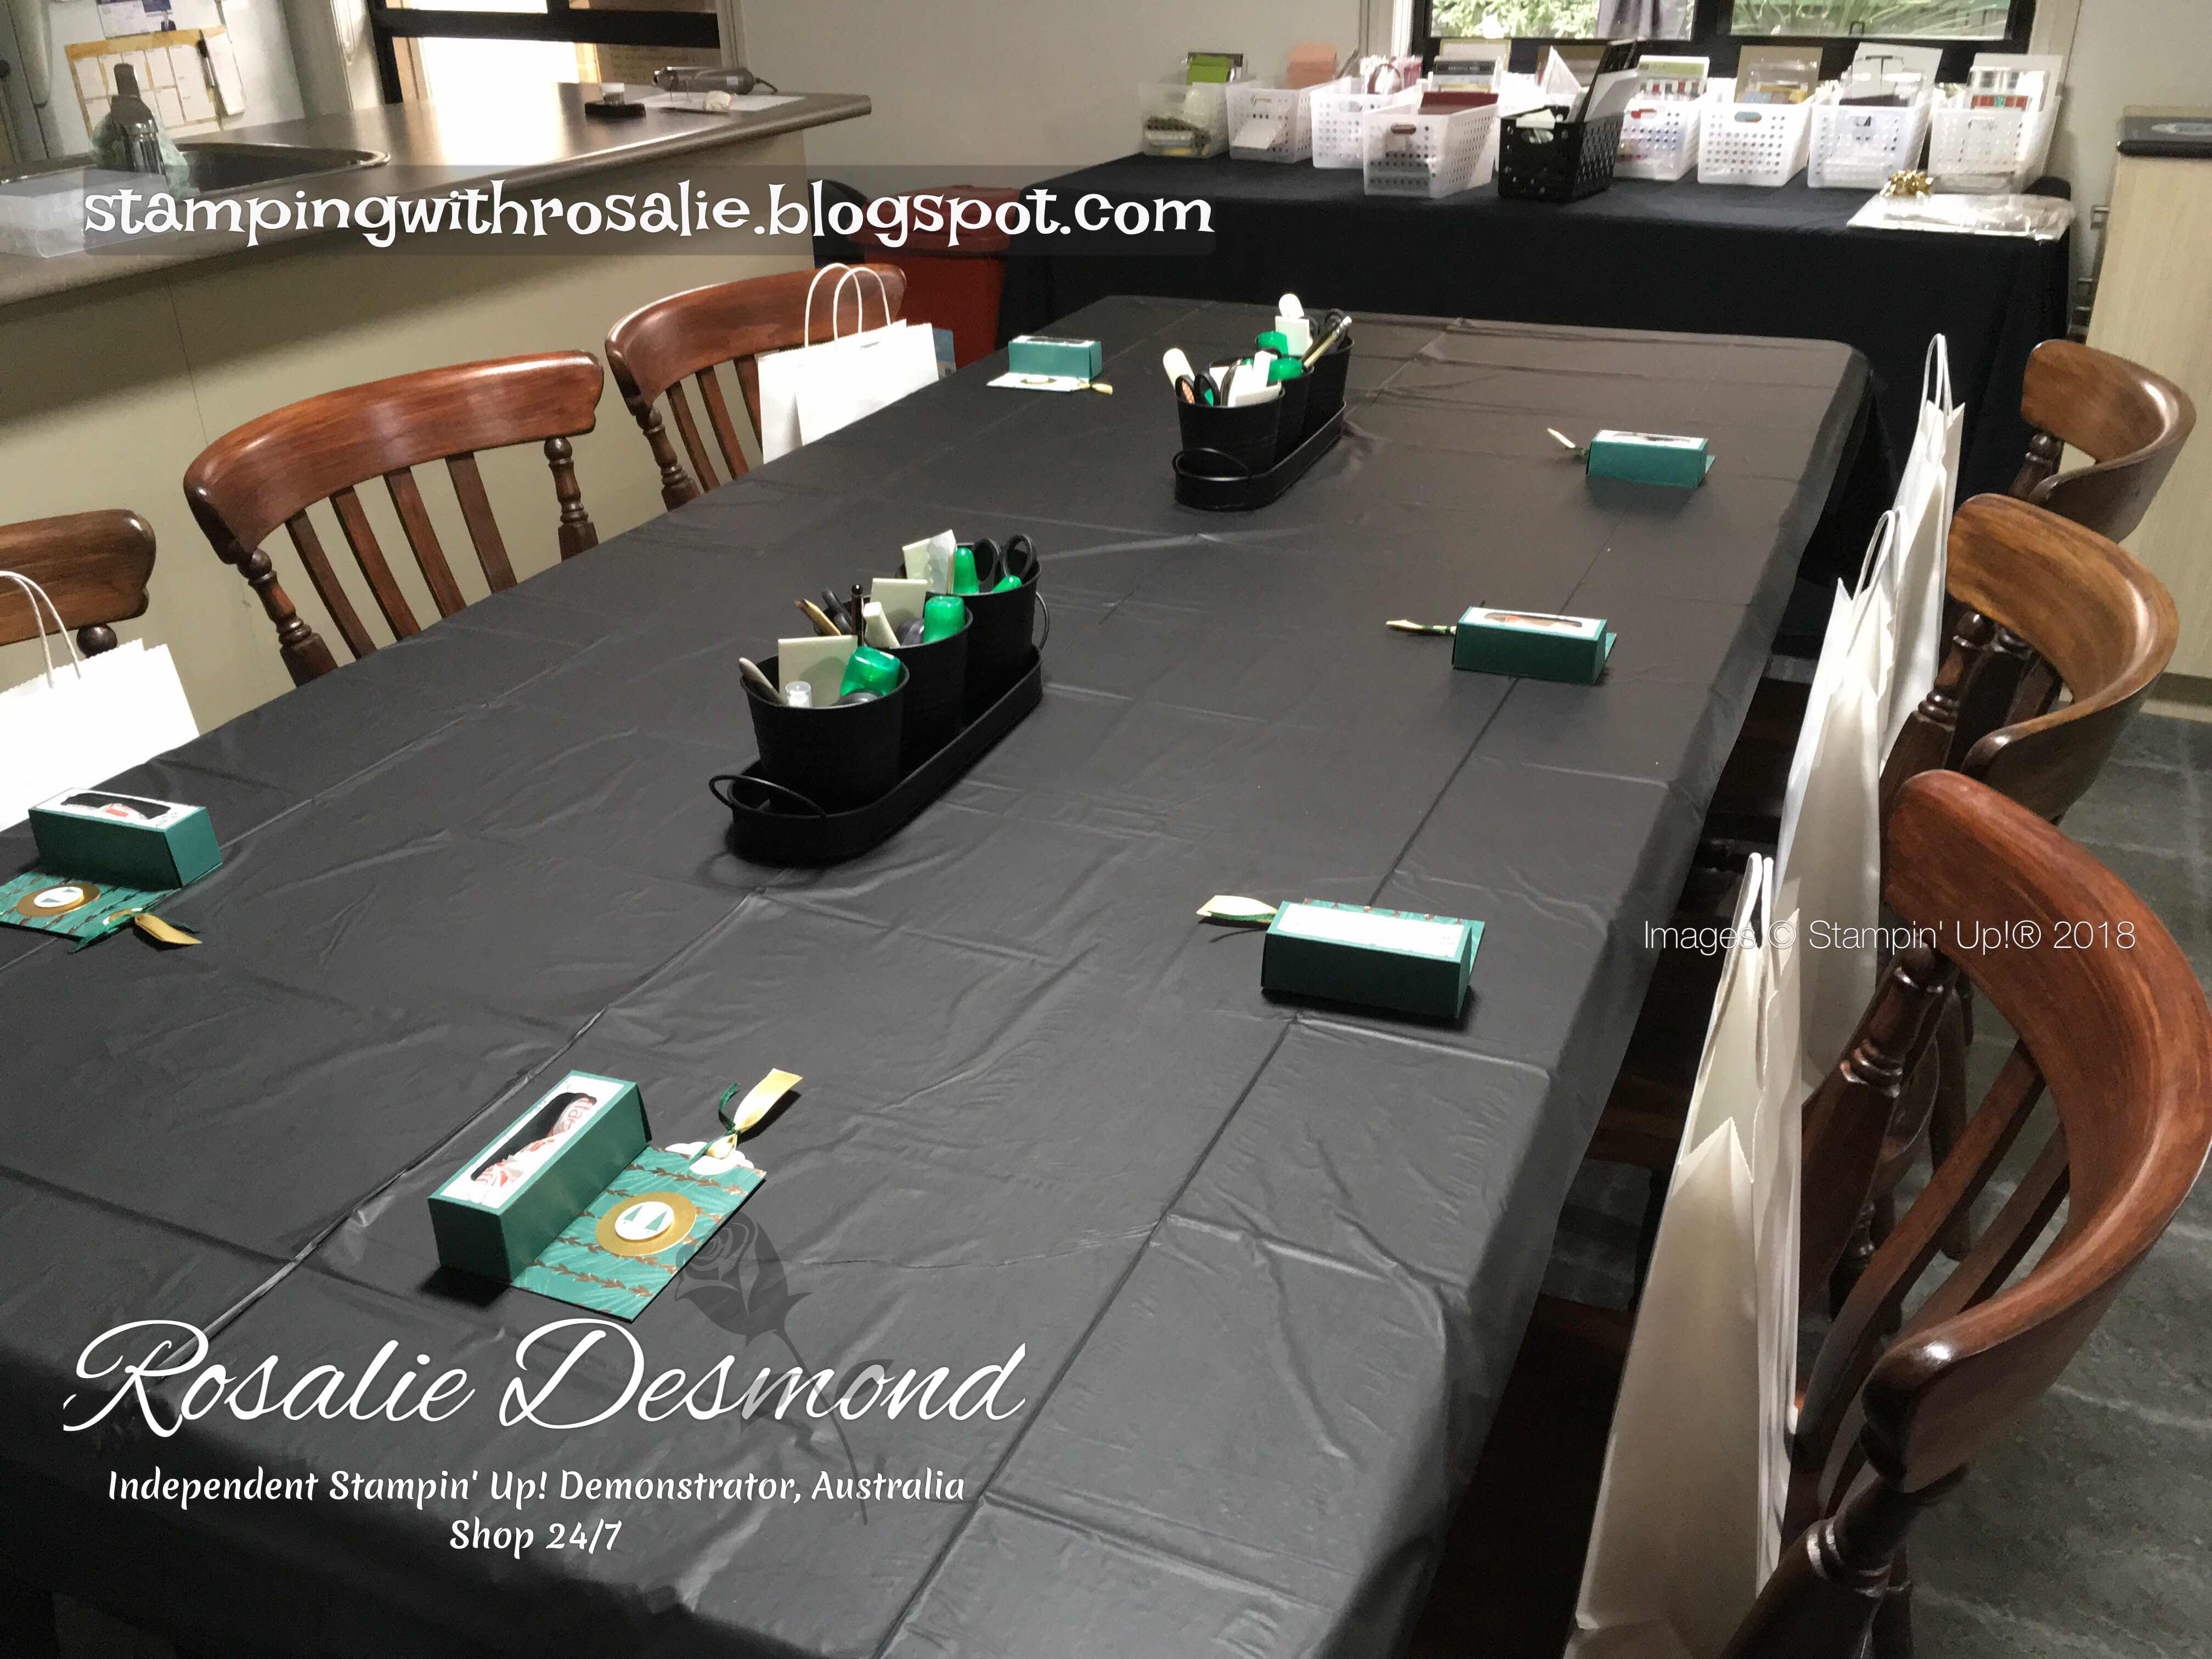
At my day long events, I also have a door prize. The name of all people in attendance are placed into a bowl and a winner is chosen at random. This was the prize for this event.


Until next time, happy crafting!

Sunday, 4 November 2018

CRAZY CRAFTERS BLOG HOP WITH SARAH FLEMING

Welcome once again to the Crazy Crafters Blog Hop. This time we are CASEing (Copying And Selectively Editing) any project that has been created by Sarah Fleming. Make sure you take the time after the hop to check out her blog. Thank you for joining us today Sarah. We hope that you find today's blog hop inspirational.

You may just of started here at my blog- Rosalie Desmond or you may of come from the previous person. Be sure to click on the person under me, which is listed further down the page to continue on with the hop.

Sarah's creations are amazing, so I found it rather difficult to choose a project to CASE. Here are the projects Sarah inspired.


The background I created is very simple to recreate. This video shows you how I made it. 


This is the card where I took my inspiration from. I adore the fun background that Sarah created, so I just couldn't go past this card. Many of Sarah's creations involve layers both stamped and card stock, so I knew combining these was a must for this CASE.


I took inspiration from the gorgeous spotty background that Sarah created. As unfortunate as it is, I also needed a Get Well Card, so I used the Healing Hugs Stamp Set. 


With the design of this card I was able to change the theme by changing the sentiment. I found that using the sentiment from Stitched All Around. 


By changing the colours, the whole look of the card changes as well. 


Make sure that you visit all the other blogs in today's hop to gain lots of ideas for your future crafting.

Happy hopping,

Sunday, 14 October 2018

EASEL CARD - Petal Palette

Sometimes I just grab some colours and a stamp set and then roll with it to see what happens. This is one of those times. I felt like making a fun fold, because it was a fun fold kind of day. So on that note, it became an Easel Card.


One of the things I love about easel cards is that they fold flat, which is wonderful for posting and also for placing inside a regular envelope.

The rose image that was used as the main focus of the card was heat embossed using white embossing powder. I then coloured the flowers using a Night of Navy Stampin' Write marker.


Easel cards are simple and fun to make.


Dimensionals are used to raise the strips of card stock, so it acts as a stopper to catch the front of the card, allowing it appear like an easel.


Until next time. Happy crafting,
Rosalie

Friday, 31 August 2018

MERRY CHRISTMAS FROM AUSTRALIA

When we purchase a stamp set we often don't notice their full protentional. We sometimes can't think past that one set and what we can do with those elements. It is a good idea to remember all those other sets that are sitting in our stash. Combining sets is a wonderful way to stretch our crafting dollar further.


As soon as I saw the kangaroo in the Animal Outing stamp set in the Annual Catalogue I knew I wanted to use it in my Christmas crafting. Then once I saw the new holiday catalogue (one of the perks of being a demonstrator is seeing the catalogues early) and noticed the So Santa set with a perfect size Santa hat.


The kangaroo is the star of the show, so I kept the design for this card very simple. Check out just how quick this card is to put together. And don't forget to subscribe to my channel.


There are so many different ways that we can colour our stamped images. We can water colour, use a blender pen, use Blends (Stampin' Up!s alcohol markers) or use Stampin' Write markers (these use the same ink as our ink pads). Use whatever you are comfortable with. I coloured the kangaroo with Blends, and the hat and presents were coloured with Stampin' Write markers.


Another thing to remember is that often non-Christmas Designer Series Paper is often very suitable to use on Christmas projects. For this card I used a piece of DSP from Tropical Escape set.

Tropical Escape 6"x6" DSP (146916)

Until next time. Happy crafting,
Rosalie


Thursday, 15 March 2018

STAMPIN' DREAMS BLOG HOP - EASTER

Welcome to the monthly Stampin' Dreams Blog Hop. This month's theme is Easter.

You are currently visiting Rosalie Desmond from Australia. I hope you enjoy my project.

While I don't usually create many Easter cards, I do like to have a few on hand. For this card I used a hostess set in the current 2017-2018 Annual Catalogue - Tranquil Tulips. 


To transform this basic image set and create a card for Easter, I teamed it up with the Teeny Tiny Sentiment set and choose "Happy Easter".


Products Used: 

Tranquil Tulips 143767

Teeny Tiny Sentiments 120024


Duet Banner Punch 141483


I hope the project you've seen here on my blog today have inspired you & brightened your day. You are currently visiting Rosalie Desmond. Please see the list below & hop through all of the people on the list to see all our projects. You don't want to miss any!


Happy Hopping,

Rosalie 


To order any of the products used to make my project, go to my SHOP NOW button on the side bar which will take you to my online store.

I run regular classes from the Western suburbs of Melbourne. I can show you how to make this, or any other project at your own party, which can either be held online via Facebook or in person. Contact me to arrange a time and to learn more about the benefits of being a hostess at your own party.


Sunday, 11 March 2018

CRAZY CRAFTERS BLOG HOP WITH JANET WAKELAND


Welcome once again to a Crazy Crafters Blog Hop. This time we are CASEing (Copy And Selectively Edit) any project that has been created by Janet Wakeland. I am so excited to have Janet joining us today, her work is absolutely brilliant. Make sure you take some time later to check out her blog. We hope you find great inspiration from todays hop.

You may just be starting the blog hop here at my blog - Rosalie Desmond or may have come from the person previous to me. Be sure to click on the person listed under me further down the page to continue your journey on this blog hop.

With inspiration from some of  Janet's creations I made this Easter card.


I took inspiration from the layout of Janet's cards and the cuteness of her little panda character and turned mine into an Easter card.


It's been awhile since I played with the Foxy Friends stamp set and the Fox Builder punch, so I used this opportunity to create a little Easter bunny. I created the punch art ears from the cut out of the tail. The bunny face is also from the Foxy Friends set.  The sentiment I used is from the Teeny Tiny Sentiments.


Products Used:

Foxy Friends 141549


Fox Builder Punch 141470


Petal Garden DSP 144168


I hope you enjoy the remainder of the hop.

Happy crafting,
Rosalie


Sunday, 25 February 2018

CRAZY CRAFTERS BLOG HOP WITH WENDY LEE


Welcome once again to a Crazy Crafters Blog Hop. This time we are CASEing (Copy And Selectively Edit) any project that has been created by Wendy Lee. I am so looking forward to have Wendy joining us today, her work is amazing. It was so hard to just choose one. Make sure you take some time later to check out her blog. We hope you find great inspiration from todays projects.

You may just be starting the blog hop here at my blog - Rosalie Desmond or may have come from the person previous to me. Be sure to click on the person listed under me further down the page to continue your journey on this blog hop.

This is the card I made using Wendy's creation as my inspiration. This card has a lot more white space than my normal work.


Here is Wendy's awesome card.


I used some of the floral images and the sentiment from the Happy Birthday Gorgeous stamp set and just a little Gold Metallic Thread.


Products used: 


Happy Birthday Gorgeous 143662


Gold Metallic Thread 138401

Stitched Shape Framelit Dies 145372

To order any of the products used to make my project, go to my SHOP NOW button on the side bar which will take you to my online store.

I run regular classes from the Western suburbs of Melbourne. I can show you how to make this, or any other project at your own party or class, which can either be held online via Facebook or in person. Contact me to arrange a time and to learn more about the benefits of being a hostess at your own party.

Happy crafting,
Rosalie

Thursday, 22 February 2018

INK & INSPIRATION BLOG HOP - TAKE INSPIRATION


Welcome to the Ink & Inspiration Blog Hop. This month our blog hop is taking inspiration from our blog logo.  You are currently visiting Rosalie Desmond from AUSTRALIA. I hope you like the project I am sharing with you this time.

This is the card I have to share with you today. 


Today I had a play with some ink refills and glossy paper. I hadn't used glossy paper before so I had a play with a few pieces of paper to see different effects. On one, I dropped ink on the paper and then spritzed water on it. The other three pieces, I added the water first and then added drops of water. 

Some people put gloves on when they do this kind of crafting to save their hands from ink - not me as you can tell from this picture. 


I hope you enjoy the remainder of the blog hop.


Until next time, have fun crafting,
Rosalie 


Graceful Garden 143849

A4 Glossy White Cardstock 144241

Monday, 19 February 2018

PETAL PALETTE BUNDLE

One of the fun things about buying bundles is that you know that the images of both the stamp set and the thinlits will always work well together as they have been designed to match. For me, this takes a lot of the thought process away.


For this card I stayed with soft colours - matching Brushing Bride with Crumb Cake and added Chocolate Chip to give a little pop to the base and the sentiment. I used the smallest flower in the Petal Palette to softly create a background. I used a thinlit from Petals & More thinlits to add some corner interest, which is simply cut out of Crumb Cake cardstock.


I added a touch of colour to the body of the bird by using a Blushing Bride Stampin' Write Marker.


Measurements:
Chocolate Chip Card Base 21 x 20cm, scored at 10.5cm
Very Vanilla Layer 9.5 x 14cm
Blushing Bride Layer 9.7 x 14.2cm
Inside Very Vanilla  Layer 9.5 x 14cm
Scraps of Crumb Cake


Petal Palette Bundle Wood 145973 Clear 145974

To order any of the products used to make my project, go to my SHOP NOW button on the side bar which will take you to my online store.

I run regular classes from the Western suburbs of Melbourne. I can show you how to make this, or any other project at your own party, which can either be held online via Facebook or in person. Contact me to arrange a time and to learn more about the benefits of being a hostess at your own party.

Thank you for stopping by,
Rosalie